Free Stage Plot Template (Download + How to Use)
9 min read · Updated July 7, 2026 · new bands
A stage plot template is a pre-laid-out starting point for your band's stage map. Pick one of four shapes, customize performers and gear, and export a PDF.
TL;DR — A stage plot template is a pre-laid-out stage map you start from instead of an empty canvas. Pick the shape that matches your act — a 4-piece rock band, an acoustic duo, a jazz trio, or a 5-piece with IEMs — then swap in your performers, gear, and monitors. In Techrider.live, the input list stays synced to whatever you place on the plot, and you can export a dated PDF in one click.
Table of contents
- What is a stage plot template?
- Why start from a template instead of a blank canvas
- Four common band stage plot templates
- How to use a template in Techrider.live
- Customizing the template for your act
- Exporting your PDF and share link
- Common mistakes to avoid
- FAQ
What is a stage plot template?
A stage plot template is a starter document that already has the bones of a stage map in place — typical performer positions, a representative backline, common mic and monitor placements, and labeled stage directions. Instead of opening a blank canvas and drawing every wedge from zero, you open a template, delete what you don't need, and move the rest into your real positions. If a stage plot is the floor plan of your show (see What Is a Stage Plot?), a template is the floor plan of a similar show you get to redraw.
Why start from a template instead of a blank canvas
Most bands never finish their first stage plot. The reason is rarely the tool — it's the blank canvas: 30 decisions at once about where the drummer sits, how many vocal mics, which way the wedge points. A template front-loads sensible defaults so you spend your time on what's specific to your band:
- Orientation is already correct — stage left/right from the performer's perspective, downstage edge toward the audience. The most common beginner mistake (flipping directions) is handled for you.
- The right channel count for your act — a 4-piece template starts with ~12–16 inputs, a duo with 3–5. You're editing, not enumerating.
- The plot and input list stay linked. In Techrider.live, every mic or DI on the template already has a channel row. Delete a mic and its row goes; rename it and both update. (More in How to Build an Input List / Patch Sheet.)
Four common band stage plot templates
Not every band needs the same scaffold. These four shapes cover most acts you'll see at a club, theater, or small festival stage.
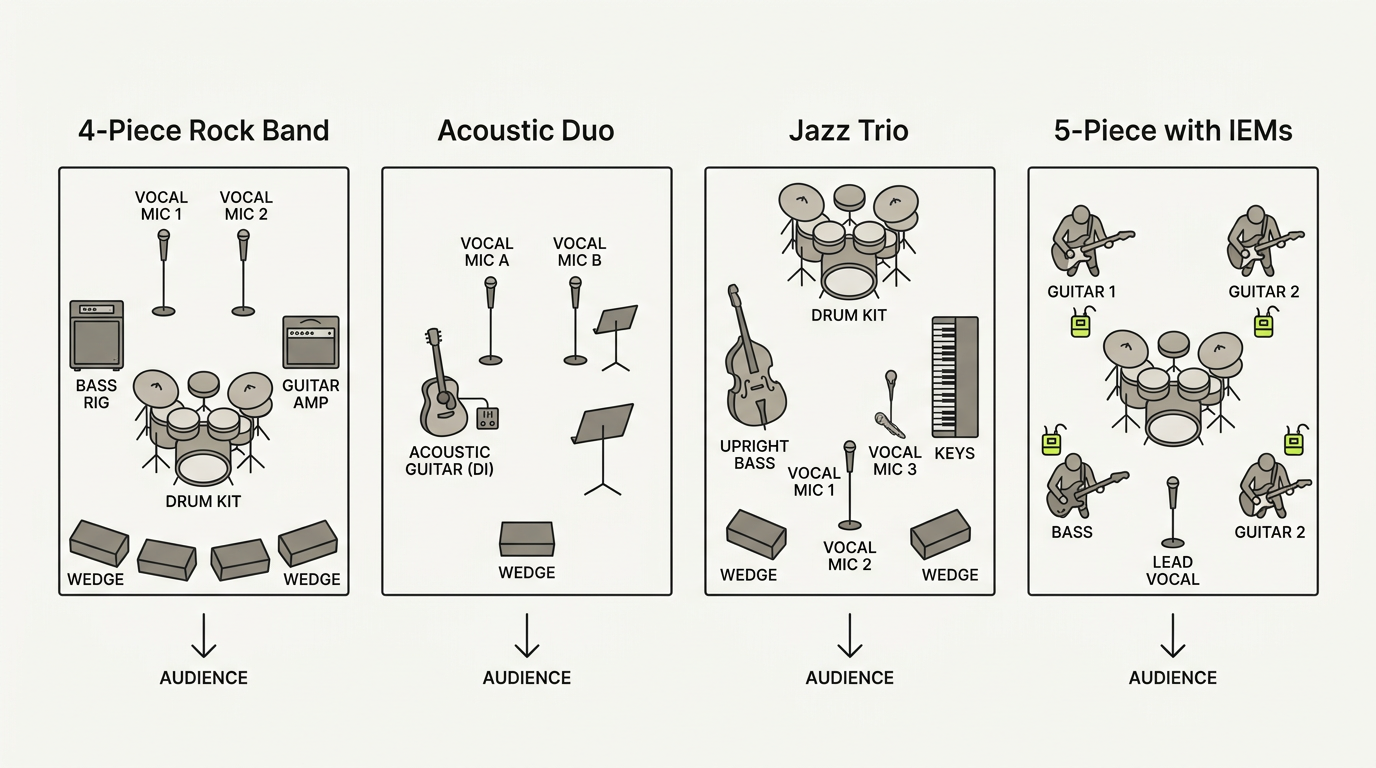 Fig. 1 — Four common starting templates: the shape is what matters; you swap in your specifics.
4-piece rock band template
The workhorse — the shape most club engineers expect and can patch in their sleep.
- Performers: drummer (downstage center, riser), lead vocalist/rhythm guitar (center), bass (stage left), lead guitar (stage right).
- Inputs (~12–16): drum close mics + overheads, bass DI, guitar cab mic, vocal mics.
- Monitors: two or three wedges along the downstage edge.
. A side panel lists the matching input list rows. Clean neutral UI, no clutter.) Fig. 2 — The 4-piece rock band template in the editor.
Acoustic duo template
For small rooms, songwriter nights, and stripped-down sets. Don't over-document — a duo rarely needs more than a handful of inputs.
- Performers: two musicians, both singing.
- Inputs (~3–5): two vocal mics, one acoustic guitar DI, possibly a second instrument DI.
- Monitors: a single shared wedge.
Fig. 3 — The acoustic duo template.
Jazz trio template
Jazz acts sit differently — drums upstage so the frontline has room, upright bass rather than a bass rig, keys to the side.
- Performers: drums (upstage center), upright bass (stage left), keys (stage right).
- Inputs (~8–10): drum kit mics (often fewer than rock), bass DI or mic, keys stereo DI, vocal mic.
- Monitors: two wedges, often lower in the mix.
5-piece with IEMs template
For bands on in-ear monitors. The visual tell: wedges disappear, IEM bodypacks appear near each performer, and the input count climbs.
- Performers: five, including a dedicated lead vocalist up front.
- Inputs (~16–20): full drum mic set, two cabs, bass DI, keys stereo, lead and backing vocals.
- Monitors: IEM bodypacks per performer; often a single "cue" wedge for the drummer.
Fig. 4 — The 5-piece with IEMs template. Note the bodypacks replacing wedges.
How to use a template in Techrider.live
- Pick a starting point. From a new Rider, open the Templates gallery and choose the shape closest to your act. It loads a populated stage plot and a matching input list — one data model, nothing to reconcile.
- Swap in your performers. Rename placeholders to your bandmates, drag them to their real positions, delete anyone who isn't playing.
- Adjust backline. Drop in your actual amp, swap the drum-kit preset if needed, add or remove keyboards.
- Fix mics, DIs, and monitors. Match your real channel count — add an input on the plot and a channel row appears; remove one and the row goes with it. Switch wedges to IEM bodypacks if your act uses ears.
- Label and check. Name every item and run the missing-info check to catch unlabeled inputs before they become a day-of phone call.
For the full from-scratch walkthrough, see How to Make a Stage Plot for Your Band.
Fig. 5 — A template being customized; the input list tracks the plot.
Bring in your band or engineer
You don't have to finish it alone. Invite up to three collaborators by email to open, edit, save, export, and inspect the history of the same Rider. This is multi-editor collaboration — you fill in positions and hand off; your drummer confirms the kit, your engineer sets mic choices and patch, each in turn on one document. (Real-time simultaneous editing with live presence is on the roadmap, not shipping today.) No emailing PDFs back and forth, no "which version is latest."
Customizing the template for your act
A template gets you 80% of the way; the last 20% makes it yours:
- Match your real channel count. Don't ship four drum channels when you use nine.
- Replace generic names. "Vocal 1" should become a real label an engineer can act on — labels are how plots survive load-in.
- Mark provided vs. brought. If the venue backlines the kit and bass rig, note it.
- Note anything unusual — a horn-section guest, a playback laptop, a sub-bass synth DI.
- Make monitor preferences explicit. "Drummer on ears, guitarist wants a wedge" prevents a rough soundcheck.
Exporting your PDF and share link
Two outputs from one Rider:
- PDF download — for the day of show. Festival networks are unreliable; a dated PDF is what gets printed at load-in. Re-export after any material change.
- Share link — a live, view-only link to the current Rider, always pointing at the latest version.
Both reflect whatever is on the plot and the input list — no separate export step for the table, no version drift.
Common mistakes to avoid
- Shipping the template as-is. Placeholder names ("Vocal 1") tell the engineer nothing.
- Leaving the plot and input list out of sync. Single-source tools prevent this; a generic drawing app does not.
- Over-documenting. A duo doesn't need a 20-channel input list.
- Flipping stage directions. The template handles orientation for you — don't undo it.
- Sending only a PDF. The PDF is your safety belt; the share link is your source of truth. Send both.
FAQ
What is a stage plot template? A pre-laid-out stage map you start from instead of a blank canvas — typical performer positions, common backline, mic and monitor placements, and labeled stage directions, which you customize to match your band.
How do I fill out a stage plot template? Rename performers to your bandmates and move them into position, swap in your backline, add or remove mics/DIs to match your channel count, set monitors, then label everything and export a PDF. In Techrider.live the input list updates as you edit the plot.
What should be included on a band stage plot? Performers and positions, instruments and backline, every mic and DI box, monitors (wedges or IEMs), power drops where relevant, and clear stage directions. Full anatomy in What Is a Stage Plot?.
Do I need a stage plot for a small band? Yes. Even a duo or trio soundchecks smoother when the engineer can pre-place mics and wedges. Start from the acoustic duo or jazz trio template and you'll have a clean plot in minutes.
Can I edit a stage plot template? Yes — that's the point. A template is a starting point, not a locked document: rename, move, add or delete inputs, switch wedges to IEMs, then export your own dated PDF.
What's next
- 🛠️ Make a stage plot from scratch (5-minute guide)
- 📋 Build an input list / patch sheet
- 🧭 Understand the full technical rider
Further reading
- Stage Plot For Bands, with Examples — DIY Musician (CD Baby)
- Best free software or website to make a simple stage plot — r/livesound
- List of Apps & Software for Designing Stage Plots — SoundGirls.org
Last updated: 2026-07-07 · Reviewed by the Techrider.live team · Tested against real festival and club stage plots.
Related guides
How to Make a Stage Plot for Your Band (5-Minute Guide)
A 5-step walkthrough to make a clean, engineer-readable stage plot for your band — set the stage, place performers, add gear and mics, then export a PDF and share link.
9 min readTutorialsHow to Build an Input List / Patch Sheet (with Template)
A channel-by-channel table of every source on stage. Learn the input list columns, the drums-to-vocals ordering, 48V and DI rules, and how a patch sheet differs.
7 min readTutorialsCollaborating on a Rider: Invite Your Engineer or TM
Invite up to 3 collaborators to edit the same tech rider on Techrider.live. Learn multi-editor, asynchronous collaboration: invite by email, co-edit, inspect history, share a view-only link, and export PDF.
7 min read