Drum Kit Stage Plot & Channel Setup
12 min read · Updated July 7, 2026 · bands, drummers, engineers
How to place a drum kit on your stage plot and set up the matching input channels — kick, snare, toms, hi-hat and overheads — with common mics, phantom power rules, and a synced channel list.
TL;DR — The drum kit is the densest part of any stage plot: it occupies the most stage space and eats the most input channels. Place it upstage center on a riser (from the performer's perspective), then document each mic as a numbered channel on the input list — typically kick, snare top/bottom, toms, hi-hat and a stereo pair of overheads, ~7–12 channels. Condenser overheads need +48V phantom power; dynamic kick and snare mics (Beta 52A, D6, SM57) do not. In Techrider.live the kit on the plot and the channels on the input list are one linked source, so renumbering a channel updates the plot — the two never drift.
Table of contents
- Why drums are the hardest part of the plot
- Where the drum kit goes on stage
- A typical drum channel breakdown
- Common mics and phantom power
- Documenting it, step by step
- Keeping the kit in sync across plot and channel list
- FAQ
- What's next
- Further reading
Why drums are the hardest part of the plot
Drums are the loudest acoustic source on stage, the biggest single piece of backline, and — for most bands — the single biggest block of input channels. A four-piece rock band can spend 8 of its 18 channels on drums alone. Get the kit right on the stage plot and the matching input list, and soundcheck falls into place. Get it wrong, and the venue engineer is repatching snake lines while the rest of the band waits.
This guide covers both halves at once — where the kit sits on the plot and how the channels line up on the list — because in practice they're one document. If you're new to either side, skim How to Make a Stage Plot first, then come back here for the drum-specific detail.
Where the drum kit goes on stage
The conventional spot is upstage center on a riser — the rear-center of the stage, behind the vocalists, facing the audience along with everyone else. It's the default almost every venue engineer expects, for good reasons:
- Sightlines. Raised on a riser, the drummer can see the whole band and the conductor/cue signals; the audience can see the kit.
- Acoustic isolation. A riser decouples the kick from the stage floor, tightening low end and stopping the kick from rumbling through every floor mic.
- Routing. Back-center keeps the long drum sub-snake and the monitor wedge/IEM feed in one controllable bundle, away from vocal mics at the downstage edge.
Orient the plot from the performer's perspective — stage left and stage right are labeled as the drummer sees them when facing the audience, not as the audience sees them. (Full breakdown: Stage Left vs Stage Right.) From the kit, hi-hat is typically to the drummer's right, ride and floor tom to the right, rack toms across the center — but for a top-down plot you mostly care about where the kit sits as a unit, not the internal layout. Place the kit footprint, mark it on a riser, and move on.
Variations exist and they're fine: some bands put drums stage left or stage right to open up the downstage center for a front-person, and a few front the kit for visual effect. If you do either, label it explicitly on the plot so the engineer doesn't assume the default.
A typical drum channel breakdown
Once the kit is placed, every mic on it becomes a channel on the input list. Channels run drums-first, kick on channel 1 — the convention virtually every console follows, so the FOH engineer's muscle memory matches your list. A typical live drum channel breakdown looks like this:
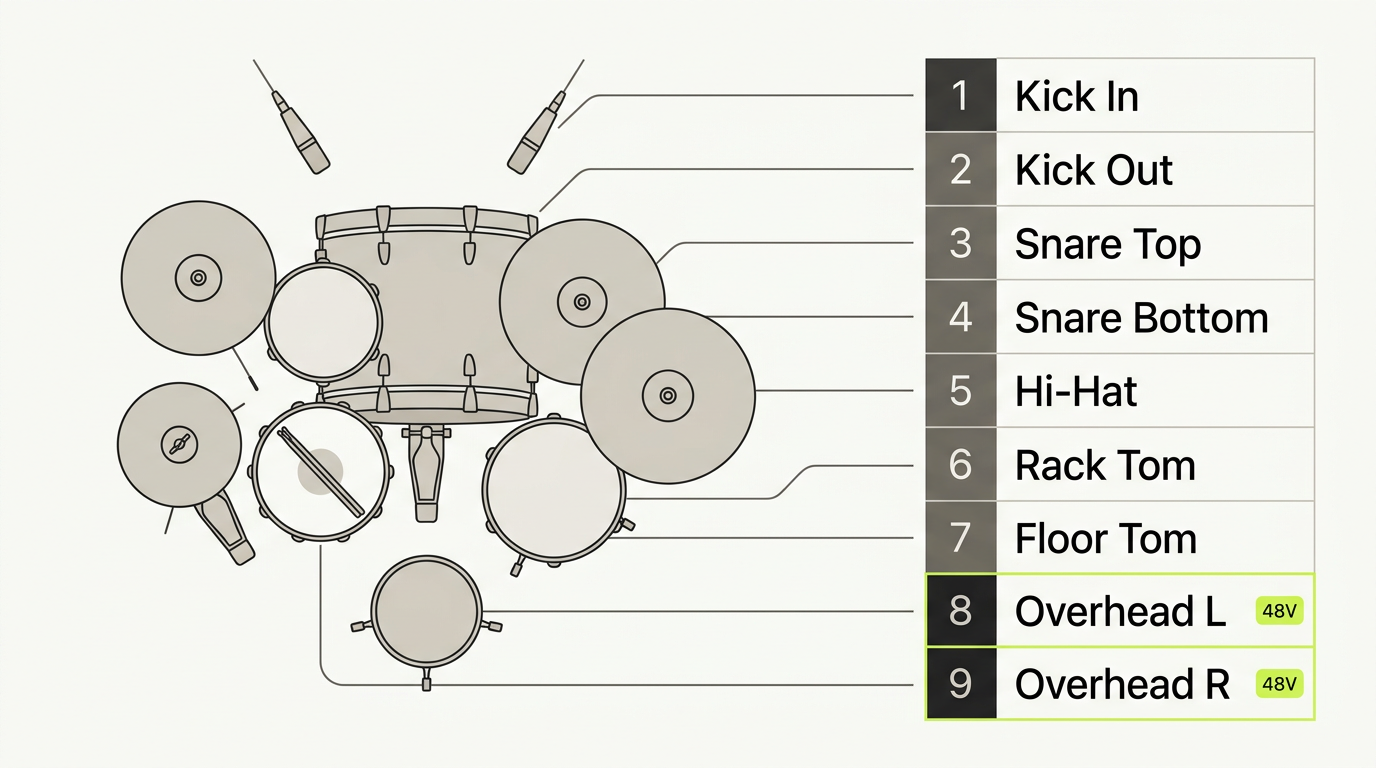
Here's what that mapping typically looks like as channels:
| Ch | Source | Mic (typical) | 48V | Notes |
|---|---|---|---|---|
| 1 | Kick In | Beta 91A / e901 | Inside the shell, attack | |
| 2 | Kick Out | Beta 52A / D6 | Outside head, low end | |
| 3 | Snare Top | SM57 / i5 | Main snare voice | |
| 4 | Snare Bottom | SM57 / e904 | Snare-wire rattle | |
| 5 | Hi-Hat | Small-diaphragm condenser | ✓ | Often omitted on small stages |
| 6 | Rack Tom | e904 / Sennheiser 421 / clip | One per rack tom | |
| 7 | Floor Tom | e904 / 421 / clip | ||
| 8 | Overhead L | Condenser (pair) | ✓ | Stereo with ch. 9 |
| 9 | Overhead R | Condenser (pair) | ✓ | Cymbals + kit blend |
That's 9 channels for a fully-miked standard kit — the most common "full" live setup. From there the count flexes in both directions:
- Minimal (3–4 channels): Kick, Snare, one or two overheads. Common on small stages where the kit largely mixes itself and the room is small enough that overheads carry the toms and cymbals.
- Standard (6–8 channels): Kick, Snare, Rack Tom, Floor Tom, stereo overheads, optional hi-hat. The default for most club and theatre gigs.
- Detailed (10–12 channels): Adds a second kick mic (kick in + kick out), snare bottom, individual tom mics, hi-hat, and sometimes a dedicated ride or room mic. Festival and touring rigs.
The exact number isn't a virtue — match the channel count to the gig, the console, and the stage size. Don't ask for 12 drum channels at a 16-channel club gig; don't show up to a festival with 4. State what you're bringing on the input list so the engineer can plan the snake and stagebox.
Common mics and phantom power
Most live drum kits are miked with a small set of workhorse microphones. You don't need the exact models below, but these are the safe defaults almost every venue and rental house stocks:
- Kick — Shure Beta 52A or Audix D6 (and often a Beta 91A or e901 inside the shell for attack). Dynamic; no phantom power.
- Snare top — Shure SM57 or Audix i5. Dynamic; no phantom power.
- Snare bottom — Another SM57 or a small clip-on like the Audix e904. Dynamic; no phantom power.
- Toms — Audix e904, Sennheiser e604, or MD 421 on rim clips. Dynamic; no phantom power.
- Hi-hat — A small-diaphragm condenser (e.g., a matched pair member). Condenser; needs +48V.
- Overheads — A matched pair of small-diaphragm condensers (e.g., Rode M5, sE Electronics sE7, Shure SM81, AKG C430, or a similar pair). Condenser; needs +48V.
The phantom-power rule is the part that bites at soundcheck: condenser mics and active DIs need +48V (P48) to operate; dynamic mics and ribbon mics do not. On a drum kit, that means only your overheads and hi-hat condenser need 48V — the kick, snare and tom dynamics are unaffected by it. Tick the 48V flag on exactly those rows of the input list so the engineer engages phantom on the right channels at patch.
Two cautions worth flagging on the list:
- Ribbon mics (sometimes used on hi-hat or as overheads) generally should not receive phantom power — some can be damaged by it. If you bring a ribbon, mark it explicitly and leave 48V off that channel.
- Phantom and patch order. Best practice is to engage 48V after mics are patched and the channel is muted, and disengage before unplugging — a small thing, but worth a note in the channel's Notes column if your kit is unusual.
Documenting it, step by step
With the kit placed and the mic plan decided, here's the build order in Techrider.live, where the plot and the channel list share one data model:
. A side panel shows the matching input list rows 1–9 (Kick In, Kick Out, Snare Top, Snare Bottom, Hi-Hat, Rack Tom, Floor Tom, Overhead L, Overhead R), with the 48V column checked on Hi-Hat and the two overheads. Clean neutral UI, the two views visibly in sync.)
- Place the kit on the plot. Drop the drum-kit backline item (or the drum-kit rig preset, if available) upstage center. Mark it on a riser and size the footprint to match what you actually bring.
- Add the mics as input items. Each mic — kick, snare top/bottom, toms, hi-hat, the overhead pair — becomes an input on the plot. In Techrider.live, adding an input auto-creates its channel row on the input list, numbered drums-first.
- Name every channel. "Kick In," "Snare Top," "OH L" — words, not just icons. An engineer scanning under load needs labels.
- Set the mic/DI and stand per channel. Dynamic on the kick and snare, condenser on the overheads; short boom or clip for close drum mics, tall boom or short stand for overheads.
- Tick 48V on the condenser channels. Hi-hat and both overheads — exactly those rows.
- Add the notes that save a call. Stereo link for the overhead pair (
stereo w/ ch.9), sub-snake ID, any pad or HPF, talkback or click if it shares the drum snake. - Run the missing-info check, then export. A missing-info scan catches the unlabeled tom or the overhead with no 48V flag before it becomes a phone call. Export the PDF (the festival safety belt) and copy the live share link (always current) for the venue.
Keeping the kit in sync across plot and channel list
The classic day-of-show error is the plot and the input list disagreeing — the table says channel 6 is "Rack Tom," the drawing labels it "Tom 2," or the engineer shows up with one fewer drum channel than the snake was patched for. It happens because most bands keep the plot in one tool, the input list in a spreadsheet, and the monitor mixes in a third doc — three sources of truth that drift the moment anyone edits one.
In Techrider.live the kit on the stage plot and the channels on the input list are one linked source:
- Add a mic to the kit → a channel row appears on the input list.
- Renumber a channel → the badge on the plot follows.
- Rename "Tom 2" to "Rack Tom" → both views update together.
- Route a drum channel into a monitor mix → the mix and the list both reflect it.
You edit one document; the plot, input list, monitor mixes, power notes and the exported PDF and live link all derive from it. That's what Rider-first means here — one source, many outputs — and it's what stops the channel-count drift that costs soundcheck time.
Want someone else to fill in the details? Invite up to three collaborators by email to open, edit, save, export, and inspect the history of the same Rider. This is multi-editor collaboration — you work, save, and hand off; your drummer or engineer picks it up and refines mic choices and patch. (Real-time simultaneous editing with live presence is on the roadmap, not shipping today.) See Collaborating on a Rider.
FAQ
How many channels does a drum kit need? It depends on the gig. A minimal setup runs 3–4 channels (kick, snare, one or two overheads); a standard live rig runs 6–8 (kick, snare, rack tom, floor tom, stereo overheads, optional hi-hat); a detailed touring or festival rig runs 10–12 (adds a second kick mic, snare bottom, individual tom mics, hi-hat). Match the count to the console, stage size, and what you actually bring.
How do you mic a drum kit for live sound? Close-mic the kick (often inside and outside the shell), snare (top, optionally bottom), and each tom with a clip-on dynamic; place a stereo pair of condenser overheads above the kit to capture cymbals and the overall kit blend. Add a hi-hat mic only if you need it. Number the channels drums-first starting at kick = channel 1.
How do you show a drum kit on a stage plot? Place the kit upstage center on a riser, sized to its real footprint, with each mic shown as an input item carrying a numbered channel badge. Mark it on a riser explicitly. Keep stage left/right oriented to the performer's perspective. (How to make a stage plot →)
What order should drum channels be in on the input list? Kick first (channel 1), then snare, toms, hi-hat, overheads — drums always start the list, with kick on channel 1, matching nearly every console's default layering. After drums come bass, guitars, keys, then vocals. (Input list guide →)
Do drum overheads need phantom power? Yes. Overheads are almost always condenser mics, which require +48V phantom power to operate. The hi-hat mic, if it's a condenser, needs 48V too. Dynamic mics on the kick, snare and toms (Beta 52A, D6, SM57, e904) do not need phantom power. Leave 48V off on ribbon mics, which it can damage.
What's next
- 📋 Build an input list / patch sheet — the full channel table the drum channels live in.
- 🗺️ Make your first stage plot — the five-step plot walkthrough, drum kit included.
- 🎛️ Configure monitor mixes and IEMs — route the drum channels into the drummer's mix.
- 🧩 Stage plot symbols & legend — the icons engineers expect to see.
- 🤝 Collaborating on a Rider — invite your drummer or engineer to edit.
Further reading
- Microphone Techniques for Drums — Shure (PDF)
- Engineering Drums Live: Part Two — Sound On Sound
- How to Make an Input List, Stage Plot and Patch a Stage — SoundGirls
Last updated: 2026-07-07 · Reviewed by the Techrider.live team · Tested against real festival and club stage plots.
Related guides
How to Make a Stage Plot for Your Band (5-Minute Guide)
A 5-step walkthrough to make a clean, engineer-readable stage plot for your band — set the stage, place performers, add gear and mics, then export a PDF and share link.
9 min readTutorialsFree Stage Plot Template (Download + How to Use)
A stage plot template is a pre-laid-out starting point for your band's stage map. Pick one of four shapes, customize performers and gear, and export a PDF.
9 min readTutorialsHow to Build an Input List / Patch Sheet (with Template)
A channel-by-channel table of every source on stage. Learn the input list columns, the drums-to-vocals ordering, 48V and DI rules, and how a patch sheet differs.
7 min read